Nikon D810: A Comprehensive User Guide (Updated 05/04/2026)
Updated May 4th, 2026, this guide unlocks your Nikon D810’s potential, detailing features, setup, operation, and maintenance for seamless photography experiences.
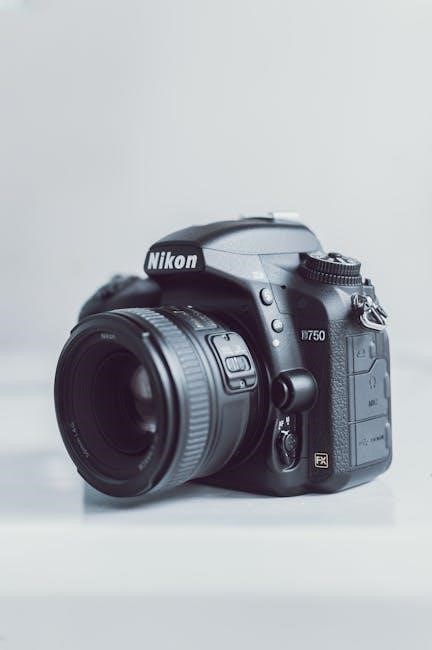
The Nikon D810 is a full-frame DSLR renowned for its exceptional image quality, dynamic range, and robust build. This comprehensive guide, updated as of May 4th, 2026, serves as your companion to mastering this powerful camera. Whether you’re a seasoned professional or an enthusiastic amateur, understanding the D810’s capabilities is key to unlocking its full potential.
This manual aims to demystify the camera’s features, offering clear instructions and practical advice. We’ll explore everything from basic operation and menu navigation to advanced shooting techniques and customization options. Drawing from user feedback and the latest firmware updates, this guide ensures you have the knowledge to confidently capture stunning images in any situation. Prepare to delve into a world of photographic possibilities!
Key Features and Specifications
The Nikon D810 boasts a 36.3MP full-frame CMOS sensor, delivering exceptional detail and low-light performance. It features a 51-point autofocus system for precise subject tracking, and continuous shooting at up to 5 frames per second. Video recording capabilities include Full HD 1080p at up to 60fps.
Key specifications include a 3.2-inch tilting LCD screen, dual card slots (CompactFlash and SD), and weather-sealed construction for durability. The camera’s ISO range extends from 64 to 12800 (expandable to 50-51200). Its robust design and advanced features make it ideal for professional photographers and serious enthusiasts seeking uncompromising image quality and reliability.
Understanding the Camera Body & Controls
Familiarizing yourself with the D810’s layout – front, rear, and top panels – is crucial for efficient operation and accessing key functions quickly.
Front Panel Controls & Functions
The Nikon D810’s front panel houses essential controls for immediate access during shooting. The lens release button allows for quick lens changes, while the function button (Fn) can be customized for frequently used settings.
Depth-of-field preview provides a visual representation of the final image’s focus area. Adjacent to the lens mount, you’ll find the AF-assist illuminator, aiding autofocus in low-light conditions.
The BKT button initiates bracketing, capturing a series of images at varying exposures. Finally, the microphone is positioned for optimal audio recording during video capture. Understanding these controls streamlines your workflow and enhances your photographic control.
Rear Panel Controls & Functions
The Nikon D810’s rear panel is a hub for reviewing images and adjusting key camera settings. The prominent LCD screen displays shooting information and allows for image playback. The directional pad navigates menus and selects focus points.
The ‘i’ button provides quick access to frequently used settings. The menu button opens the comprehensive camera menu system. Playback buttons facilitate image review, zooming, and deletion.
The Live View button activates Live View shooting, while the video record button initiates video recording. Finally, the viewfinder diopter adjustment ensures a clear view for all users. Mastering these controls is crucial for efficient operation.
Top Panel Controls & Functions
The Nikon D810’s top panel houses essential controls for immediate shooting adjustments. The mode dial selects shooting modes like Auto, Aperture Priority, Shutter Priority, and Manual. The main command dial adjusts settings like aperture, shutter speed, and exposure compensation.
The shutter release button initiates the capture process, and the on/off switch with its surrounding collar activates the camera. The B button enables Bulb mode for long exposures.
A dedicated ISO button allows quick ISO sensitivity changes. The metering mode button selects the desired metering method. Familiarizing yourself with these controls enables swift and intuitive camera operation in various shooting scenarios.
Button Customization Options
The Nikon D810 offers extensive button customization, allowing photographers to tailor the camera to their specific workflow. Access the Custom Setting menu (f1) to remap functions to various buttons. You can assign frequently used settings like AF-ON, depth-of-field preview, or exposure delay mode to buttons for quicker access.
Customize the Fn button for instant access to essential features. The preview button can be reassigned. This level of personalization streamlines operation, reducing the need to navigate menus during critical shooting moments. Experiment with different configurations to find what best suits your shooting style.

Setting Up Your Nikon D810
Initial setup is crucial; configure date, time, and language settings via the menu for a personalized experience and accurate image metadata.
Menu System Navigation
The Nikon D810’s menu system, accessed via the ‘MENU’ button, is logically organized into several tabs represented by colored icons. These include Setup, Shooting, Custom Settings, Video, and Retouch. Navigating is done using the multi-selector and rotating the main command dial to highlight and adjust options.
Understanding the hierarchical structure is key. Pressing ‘OK’ selects a menu item, often leading to submenus. To return to the previous menu, press the ‘MENU’ button again. The ‘i’ button provides quick access to frequently used settings. Customizing the menu display allows you to prioritize settings you adjust often, streamlining your workflow. Remember to explore each tab to fully grasp the camera’s capabilities and personalize it to your shooting style.
Initial Camera Setup (Date, Time, Language)
Upon first powering on your Nikon D810, the initial setup screen will guide you through essential configurations. Begin by selecting your preferred language from the displayed list using the multi-selector and confirming with the ‘OK’ button. Next, accurately set the date and time. Incorrect settings can affect image metadata and organization.
The date/time format can be customized to your preference. Following this, you may be prompted to choose a time zone. Accurate time zone selection ensures correct EXIF data. These initial settings are crucial for proper camera operation and file management. Access these settings later via the Setup menu if adjustments are needed.
Choosing Your Image Quality Settings
The Nikon D810 offers extensive image quality options, impacting file size and detail. Navigate to the shooting menu to access these settings. Select from RAW, JPEG, or RAW+JPEG. RAW provides maximum editing flexibility, while JPEG offers smaller file sizes for immediate use. RAW+JPEG captures both formats simultaneously.
Within JPEG settings, choose your desired image quality level – Basic, Normal, Fine, or Super Fine. Higher quality settings yield larger files with more detail. Consider your intended use; web display requires lower resolution than large prints. Bit depth selection (8-bit or 14-bit for RAW) also influences dynamic range. Experiment to find the optimal balance between quality and storage space.

Mastering Shooting Modes
Explore diverse shooting modes on your Nikon D810, from fully automatic options to complete manual control, empowering creative photographic expression and technique.
Auto Modes (Auto, Scene)
The Nikon D810’s Auto modes offer simplicity for beginners or quick snapshots. Auto mode intelligently selects settings based on detected scene conditions, prioritizing ease of use. For more specific situations, Scene modes provide pre-configured settings tailored to landscapes, portraits, sports, and more.
These modes are excellent starting points, but remember they limit creative control. While convenient, relying solely on Auto modes hinders learning the fundamentals of photography – aperture, shutter speed, and ISO. Experimenting with these settings manually unlocks the D810’s full potential. Scene modes, though helpful, can sometimes misinterpret the scene, leading to suboptimal results. Understanding why a setting is chosen is crucial for photographic growth.
Aperture Priority (A) Mode
Aperture Priority (A) mode on the Nikon D810 grants you control over the lens’s aperture, directly influencing depth of field and creative blur (bokeh). You select the f-stop (e.g., f/2.8 for shallow depth of field, f/16 for extensive sharpness), and the camera automatically determines the appropriate shutter speed for correct exposure.
This mode is ideal for portraiture, landscapes, and situations where controlling depth of field is paramount. Remember to monitor the shutter speed; excessively slow speeds can introduce motion blur. The D810’s metering system works effectively in A mode, but exposure compensation may be needed in challenging lighting. Mastering A mode is a significant step towards photographic artistry.
Shutter Priority (S) Mode
Shutter Priority (S) mode on your Nikon D810 empowers you to dictate the shutter speed, controlling motion blur and freezing action. Select a fast shutter speed (e.g., 1/1000s) to halt fast-moving subjects, or a slower speed (e.g., 1/30s) to create intentional motion blur. The camera then automatically adjusts the aperture to achieve proper exposure.
This mode excels in sports, wildlife, and any scenario where capturing or depicting movement is key. Be mindful of the resulting aperture; a narrow aperture (high f-number) may be necessary in bright conditions, potentially impacting depth of field. Utilize exposure compensation to fine-tune results as needed, ensuring optimal image quality.
Manual (M) Mode – Full Control
Manual (M) mode grants complete creative authority over both aperture and shutter speed on your Nikon D810. This mode is ideal for situations demanding precise exposure control, like challenging lighting or specific artistic effects. You independently set both values, observing the light meter to achieve desired exposure.
Mastering Manual mode requires understanding the interplay between aperture, shutter speed, and ISO. It allows for consistent exposure across a series of shots, crucial for video or complex compositions. While demanding, it unlocks unparalleled creative potential, letting you override the camera’s automatic settings for truly personalized results.

Focusing Techniques
Achieve sharp images with the D810 using autofocus modes, manual focus precision, and selecting appropriate focus area modes for diverse shooting scenarios.
Autofocus Modes & Settings
The Nikon D810 offers a versatile array of autofocus (AF) modes to suit various photographic situations. Single-servo AF (AF-S) is ideal for stationary subjects, locking focus when the shutter button is half-pressed. Continuous-servo AF (AF-C) excels with moving subjects, continuously tracking focus as they change position. Auto-servo AF (AF-A) automatically switches between AF-S and AF-C, attempting to determine the best mode – useful for unpredictable movement.
Within these modes, you can customize settings like AF-area mode (Single-point AF, Dynamic-area AF, Group-area AF, Auto-area AF) to define how the camera selects the focus point. Tracking focus is available in AF-C, allowing you to maintain focus on a moving subject as it travels across the frame. Fine-tuning AF performance is possible via the AF fine-tune option, compensating for slight lens imperfections. Understanding these settings empowers you to consistently capture sharp, well-focused images.
Manual Focus Operation
The Nikon D810 provides precise manual focus control for situations where autofocus struggles, or for deliberate creative effects. Switch the focus mode on the camera body or lens to ‘M’ (Manual). Rotate the focusing ring on the lens to adjust sharpness, observing the image on the LCD screen or through the viewfinder.
Utilize Live View with focus peaking – a visual aid highlighting in-focus areas – for enhanced accuracy. Zooming in on the Live View image allows for critical focus assessment. The D810’s bright viewfinder and split-image rangefinder (in some lenses) also assist manual focusing. Remember, manual focus requires patience and a keen eye, but offers ultimate control over your image’s sharpness and artistic intent.
Focus Area Modes & Selection
The Nikon D810 offers diverse focus area modes to suit various shooting scenarios. Single-point AF isolates focus on a chosen point, ideal for static subjects. Dynamic-area AF utilizes surrounding points if the initial point loses the subject, useful for moving targets. Group-area AF employs a cluster of points, enhancing tracking capability.
Auto-area AF lets the camera automatically select focus points, best for general photography. 3D-tracking continuously follows a subject as it moves across the frame. Selection is made via the AF-area mode button on the camera’s back, adjusted with the sub-command dial. Experiment to find the mode best suited to your subject and shooting style for consistently sharp results.

Exposure Control & Metering
Mastering exposure on the D810 involves understanding the interplay of aperture, shutter speed, and ISO, alongside utilizing the camera’s versatile metering systems.
Understanding Exposure Triangle (Aperture, Shutter Speed, ISO)
The exposure triangle – aperture, shutter speed, and ISO – forms the foundation of photographic control on the Nikon D810. Aperture controls the lens opening, influencing depth of field and light intake; wider apertures (lower f-numbers) create shallow depth of field, ideal for portraits, while narrower apertures (higher f-numbers) maximize sharpness across the scene.
Shutter speed dictates how long the sensor is exposed to light, impacting motion blur. Faster shutter speeds freeze action, while slower speeds allow for creative motion blur effects. Finally, ISO measures the sensor’s sensitivity to light; lower ISOs produce cleaner images, but require more light, whereas higher ISOs enable shooting in low-light conditions, potentially introducing noise.
Balancing these three elements is crucial for achieving a properly exposed image, and understanding their relationships empowers photographers to creatively control their results.
Metering Modes (Matrix, Center-Weighted, Spot)
The Nikon D810 offers three primary metering modes to accurately assess scene brightness. Matrix metering analyzes the entire frame, providing a balanced exposure suitable for most situations. It’s intelligent and reliable for general photography. Center-weighted metering prioritizes the center of the frame, useful when your subject is centrally located and you want to ensure its proper exposure.
Spot metering measures light from a very small area, allowing precise exposure control for challenging lighting scenarios or specific subjects. This is ideal for backlit subjects or high-contrast scenes. Selecting the appropriate mode ensures your images are consistently well-exposed, maximizing detail and clarity.
Exposure Compensation
Exposure compensation on the Nikon D810 allows you to override the camera’s automatically determined exposure. It’s measured in stops (+/- EV), offering precise control over brightness. Use positive values (+EV) to brighten images, useful for dark subjects or backlit scenes, preventing underexposure. Conversely, negative values (-EV) darken images, ideal for bright subjects or to avoid blown-out highlights.
This feature is crucial when the camera’s metering system is fooled by unusual lighting conditions. Mastering exposure compensation ensures you consistently achieve the desired brightness and tonal range in your photographs, enhancing creative control.

Advanced Features & Settings
Explore powerful tools like Live View, time-lapse, multiple exposure, and customizable Picture Control profiles to unlock the D810’s full creative potential.
Live View Shooting
Nikon’s Live View mode offers a unique shooting experience, displaying the image directly on the LCD screen. This is incredibly useful for precise composition, especially when using a tripod, and allows for detailed focus confirmation. Access Live View by flipping the mirror up using the dedicated lever.
Within Live View, you can utilize various focusing methods, including autofocus and manual focus with magnification for critical sharpness; Exposure can be previewed in real-time, allowing adjustments before capturing the shot. Remember that prolonged Live View usage can lead to sensor heating, potentially impacting image quality, so monitor the warning indicators. Experiment with different settings to master this versatile feature and expand your photographic possibilities.
Time-Lapse Photography
The Nikon D810 excels in time-lapse photography, allowing you to capture slow changes over extended periods. Utilize the built-in intervalometer function to define the shooting interval and total number of shots. Access this feature through the shooting menu, setting parameters like interval time (seconds or minutes) and the maximum number of frames.
For optimal results, use a stable tripod and consider power options for long shoots. Images are captured automatically at set intervals, and can then be assembled into a video using post-processing software. Experiment with different intervals to achieve desired effects – shorter intervals for fast-paced action, longer for subtle changes.
Multiple Exposure Mode
The Nikon D810’s Multiple Exposure mode creatively blends two or more images into a single frame, offering unique artistic possibilities. Access this feature via the shooting menu, choosing between sequential shooting (camera automatically captures each frame) or manual shooting (you trigger each exposure).
You can select the number of exposures (up to nine) and the blending mode (Average, Additive, Brightness, or Darkeness). Experiment with different blending modes to achieve varied effects. Review the resulting image carefully, as adjustments after capture are limited. This mode is ideal for creating surreal or dreamlike imagery, layering textures, and exploring abstract compositions.
Using Picture Control Profiles
Nikon’s Picture Control profiles offer pre-defined settings to tailor your images’ appearance directly within the camera. Accessible through the shooting menu, these profiles – Standard, Neutral, Vivid, Monochrome, Portrait, Landscape, and Flat – adjust parameters like sharpness, contrast, saturation, and tone.
Each profile caters to specific shooting scenarios; For example, Landscape enhances blues and greens, while Portrait softens skin tones. You can further customize these profiles or create your own user-defined settings. Shooting in RAW format allows for extensive post-processing flexibility, but Picture Controls provide a great starting point for achieving your desired look in-camera.

Connectivity & Data Transfer
Seamlessly transfer images from your Nikon D810 via USB, optional wireless adapters, or HDMI output to computers and displays for editing and sharing.
Connecting to a Computer (USB)
Establishing a USB connection between your Nikon D810 and a computer allows for efficient image transfer and camera control. Begin by ensuring your computer recognizes the camera; install Nikon’s software if prompted. Use a high-quality USB cable for optimal data transfer speeds and stability.
Once connected, the camera will typically appear as a removable drive on your computer. You can then directly copy images and videos to your desired folders. Alternatively, utilize Nikon’s software (like Capture NX-D or ViewNX-i) for advanced features such as tethered shooting and image organization. Remember to safely eject the camera from your computer before disconnecting the USB cable to prevent data corruption. Proper connection ensures reliable data transfer and camera functionality.
Wireless Transfer with Optional Adapters
The Nikon D810 doesn’t have built-in Wi-Fi, but wireless transfer is achievable using optional adapters. The WT-5A Wireless File Transmitter is a popular choice, connecting to the camera’s accessory terminal. This allows for image transfer to smartphones, tablets, or computers via a dedicated app or web browser.
Setup involves installing the WT-5A, configuring its settings through the camera’s menu, and connecting to a wireless network. Ensure the adapter is compatible with your network’s security protocols. Alternative adapters may also exist, offering varying features and compatibility. Wireless transfer provides convenient image sharing and remote control capabilities, enhancing your workflow without direct cable connections.
Using HDMI Output
The Nikon D810 features a standard HDMI (High-Definition Multimedia Interface) output, enabling connection to external displays like HDTVs or monitors. This allows for viewing your photos and videos on a larger screen, ideal for reviewing images or presenting slideshows. To use HDMI, connect a compatible HDMI cable from the camera to the display.
Within the camera’s menu, you can adjust the HDMI output settings, including resolution (typically 1080p) and information displayed. Some displays may require manual input selection. Ensure the display supports HDCP (High-bandwidth Digital Content Protection) if needed. HDMI output is also useful for live view monitoring during studio shoots or tethered photography workflows.